Quickstart
Follow these steps to install the Tezos SDK for Unity in an existing Unity project and start using it.
These instructions cover:
- Installing the SDK into an existing Unity project
- Testing that the SDK works in your project
- Connecting to a user's Tezos wallet
- Creating and managing tokens
- Prompting the user to sign messages
Installing the SDK
-
In your Unity project, in the Package Manager panel, click the
+symbol and then click Add package from git URL. -
Enter the URL
https://github.com/trilitech/tezos-unity-sdk.gitand click Add.The Package Manager panel downloads and installs the SDK. You can see its assets in the Project panel under Packages > Tezos Unity SDK.
-
Ensure that you have a Tezos-compatible wallet configured for the Ghostnet testnet on your mobile device. For instructions, see Installing and funding a wallet.
-
If you want to publish the project to WebGL, follow the steps in Enabling WebGL support.
-
To import the tutorial scenes, see Scenes.
Enabling WebGL support
The Unity SDK provides a WebGL template that you can use to publish Unity projects to run in a web browser. Follow these steps to set up the Tezos SDK to work with WebGL:
-
In the Unity Editor, go to the Project panel and expand the Packages > Tezos Unity SDK > WebGLFrontend folder.
-
From the
WebGLFrontend/outputfolder, copy theStreamingAssetsandWebGLTemplatesfolders into theAssetsfolder of your project. -
Select the AirGap template to use in the WebGL build:
-
Click Edit > Project Settings.
-
Go to the Player tab.
-
On the Player tab, go to the WebGL settings tab.
-
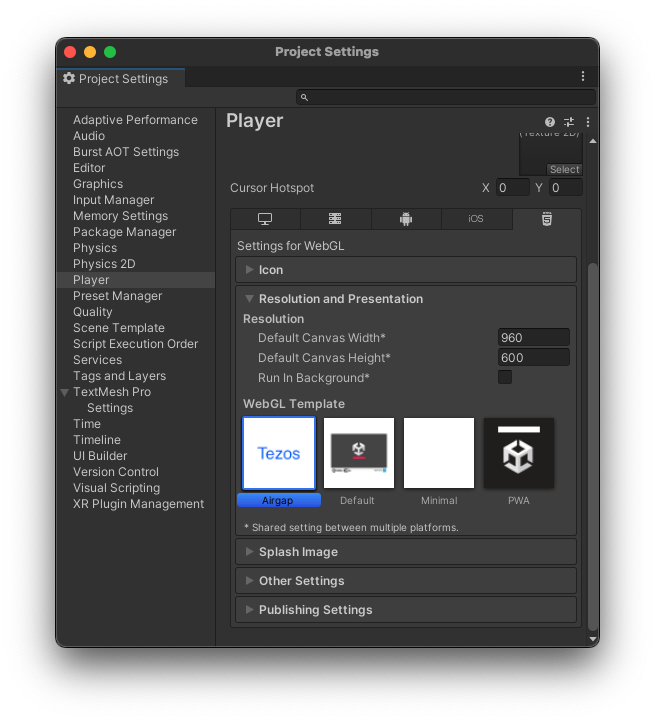
Under Resolution and Presentation, select the AirGap WebGL template, as shown in this picture:

-
-
To enable copy and paste in the WebGL build, double-click
_WebGLCopyAndPaste.unitypackage, which is in theWebGLFrontend/outputfolder of the SDK, to install it.This package automatically enables copy and paste on selectable text fields, such as the account address field in the WalletConnection tutorial scene.
Connecting to wallets
Connecting to a user's wallet is a prerequisite to working with Tezos in any application. Accessing the wallet allows your project to see the tokens in it and to prompt the user to submit transactions, but it does not give your project direct control over the wallet. Users must still confirm all transactions in their wallet application.
Using a wallet application in this way saves you from having to implement payment processing and security in your application. Game developers can also use the wallet and its account as a unique account identifier and as the user's inventory.
-
Copy the
TezosAuthenticatorandTezosManagerprefabs to your scene. These prefabs provide prerequisites to use Tezos in a scene and help connect to accounts. For more information about them, see Prefabs.The
TezosAuthenticatorprefab automatically adds features that connect to users' wallets. If you copy these prefabs into your scene and run it, it shows a QR code or connection buttons that Tezos wallet applications can scan to connect with the application. Whether it shows the QR code or buttons depends on whether the project is running in standalone, mobile, or WebGL mode. -
Add features to your project to use the connected account. For example, the
Tutorials/Common/Scripts/WalletInfoUI.csfile responds to theWalletConnectedevent, which runs when the user approves the connection in their wallet application. You can use this event to get the address of the connected account, as in this code:private void Start()
{
addressText.text = NOT_CONNECTED_TEXT;
// Subscribe to events;
TezosManager.Instance.EventManager.WalletConnected += OnWalletConnected;
TezosManager.Instance.EventManager.WalletDisconnected += OnWalletDisconnected;
}
private void OnWalletConnected(WalletInfo walletInfo)
{
// We can get the address from the wallet
addressText.text = TezosManager.Instance.Wallet.GetWalletAddress();
// Or from the event data
addressText.text = walletInfo.Address;
}
private void OnWalletDisconnected(WalletInfo walletInfo)
{
addressText.text = NOT_CONNECTED_TEXT;
}You can use this address as a user's account ID because Tezos account addresses are unique.
-
To respond to other events, add listeners for the events that the SDK provides. You can see these events and their return values in the EventManager object.
For an example, see the WalletConnection tutorial scene.
Deploying contracts
Contracts are backend programs that run on the Tezos blockchains. Smart contracts can do many tasks, but for gaming they have two main purposes:
- They handle tokens, which are digital assets stored on the blockchain
- They provide backend logic that users can trust because it cannot change
The ContractAndMinting tutorial scene shows how to deploy a contract from a Unity project.
The SDK provides a built-in contract that you can use instead of writing your own. This contract manages different kinds of tokens.
To deploy the built-in contract, call the TokenContract.Deploy() method and pass a callback function:
public void DeployContract()
{
    TezosManager
        .Instance
        .Tezos
        .TokenContract
        .Deploy(OnContractDeployed);
}

private void OnContractDeployed(string contractAddress)
{
    Debug.Log(contractAddress);
}
The project sends the deployment transaction to the connected wallet, which must approve the transaction and pay the related fees.
The SDK stores the address of the contract as TokenContract.address.
For an example, see the ContractAndMinting tutorial scene.
Creating tokens
To create a token type, call the contract's mint entrypoint and pass these parameters:
- A callback function to run when the token is created
- The metadata for the token, which includes a name and description, URIs to preview media or thumbnails, and how many decimal places the token can be broken into
- The destination account that owns the new tokens, which can be a user account, this smart contract, or any other smart contract
- The number of tokens to create
For example, this code creates a token type with a quantity of 100:
// Get the address of the connected wallet
var initialOwner = TezosManager
    .Instance
    .Wallet
    .GetWalletAddress();

// To preview the IPFS-hosted image:
// https://ipfs.io/ipfs/QmX4t8ikQgjvLdqTtL51v6iVun9tNE7y7Txiw4piGQVNgK
const string imageAddress = "ipfs://QmX4t8ikQgjvLdqTtL51v6iVun9tNE7y7Txiw4piGQVNgK";

// Prepare metadata
var tokenMetadata = new TokenMetadata
{
    Name = "My token",
    Description = "Description for my token",
    Symbol = "MYTOKEN",
    Decimals = "0",
    DisplayUri = imageAddress,
    ArtifactUri = imageAddress,
    ThumbnailUri = imageAddress
};

// Call the "mint" entrypoint of the contract
TezosManager
    .Instance
    .Tezos
    .TokenContract
    .Mint(
        completedCallback: OnTokenMinted,
        tokenMetadata: tokenMetadata,
        destination: initialOwner,
        amount: 100);

// This callback is triggered after the contract call successfully completes and the resulting transaction is recorded on the blockchain.
private void OnTokenMinted(TokenBalance tokenBalance)
{
    Debug.Log($"Successfully minted token with Token ID {tokenBalance.TokenId}");
}
For an example, see the ContractAndMinting tutorial scene.
Transferring tokens
To transfer tokens, call the contract's Transfer entrypoint and pass these parameters:
- A callback function to run when the transfer is complete
- The account to transfer the tokens to
- The ID of the token
- The amount of tokens to transfer
This example transfers 12 tokens with the ID 5 to the account in the variable destinationAccountAddress.
public void HandleTransfer()
{
    TezosManager
        .Instance
        .Tezos
        .TokenContract
        .Transfer(
            completedCallback: TransferCompleted,
            destination: destinationAccountAddress,
            tokenId: 5,
            amount: 12);
}

private void TransferCompleted(string txHash)
{
    Logger.LogDebug($"Transfer complete with transaction hash {txHash}");
}
For a complete example, see the Transfer tutorial scene.
Getting token balances
To get the tokens that the connected account owns, call the API.GetTokensForOwner() method in a coroutine.
This example prints information about the tokens that the account owns to the log:
private void Start()
{
    // Subscribe to account connection event
    TezosManager.Instance.EventManager.WalletConnected += OnWalletConnected;
}

private void OnWalletConnected(WalletInfo walletInfo)
{
    // Address of the connected wallet
    var address = walletInfo.Address;

    // Prepare the coroutine to fetch the tokens
    var routine = TezosManager.Instance.Tezos.API.GetTokensForOwner(
        OnTokensFetched, // Callback to be called when the tokens are fetched
        address, true, 10_000, new TokensForOwnerOrder.ByLastTimeAsc(0));

    StartCoroutine(routine);
}

private void OnTokensFetched(IEnumerable<TokenBalance> tokenBalances)
{
    var walletAddress = TezosManager.Instance.Wallet.GetWalletAddress();
    var contractAddress = TezosManager.Instance.Tezos.TokenContract.Address;

    var tokens = new List<TokenBalance>(tokenBalances);

    // Filter the tokens by the current contract address
    var filteredTokens = tokens.Where(tb => tb.TokenContract.Address == contractAddress).ToList();

    if (filteredTokens.Count > 0)
    {
        foreach (var tb in filteredTokens)
        {
            Debug.Log($"{walletAddress} has {tb.Balance} tokens on contract {tb.TokenContract.Address}");
            Debug.Log(tb.TokenMetadata);
        }
    }
    else
    {
        Debug.Log($"{walletAddress} has no tokens in the active contract");
    }
}
Uploading files to IPFS
The InterPlanetary File System (IPFS) is a protocol and peer-to-peer network for storing and sharing data in a distributed file system. Blockchain developers use it to store data such as token images and metadata.
The SDK provides tools to upload to IPFS by using the Pinata API, but you can set up IPFS upload in other ways.
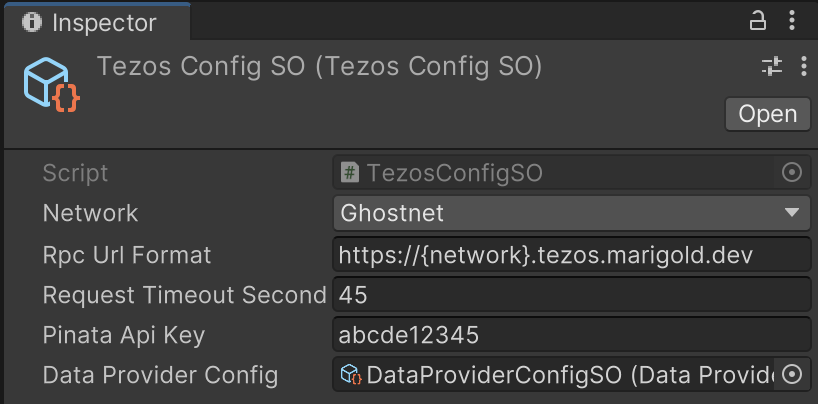
To use the SDK, create instances of the Tezos Configuration and Data Provider Configuration objects and put your Pinata JWT (not the API key or secret) in the TezosConfigSO object's Pinata Api Key field.
To use the SDK, see the code in the UploadImageButton.cs file, which handles uploading files in the IPFSUpload scene.
It has a UI upload button that triggers this method, which uses the built-in Pinata uploader to upload the file and get the URL for it:
public void HandleUploadClick()
{
    if (string.IsNullOrEmpty(TezosManager.Instance.Config.PinataApiKey))
    {
        Logger.LogError("Can not proceed without Pinata API key.");
        return;
    }

    var uploader = UploaderFactory.GetPinataUploader(TezosManager.Instance.Config.PinataApiKey);

    var uploadCoroutine = uploader.UploadFile(ipfsUrl =>
    {
        Logger.LogDebug($"File uploaded, url is {ipfsUrl}");
    });

    StartCoroutine(uploadCoroutine);
}
For a complete example, see the IPFSUpload tutorial scene.
Signing messages
You can also use the connection to the user's wallet to prompt them to sign messages. Signing a message proves that it came from a specific user's wallet because the wallet encrypts the message with the user's account's key.
For example, this code prompts the user to sign the message "This message came from my account." Then, the callback verifies that the signature is valid and that it came from the user's account:
string payload = "This message came from my account.";

private void Start()
{
    // Subscribe to the wallet event
    TezosManager.Instance.EventManager.PayloadSigned += OnPayloadSigned;

    TezosManager.Instance.Wallet.RequestSignPayload(SignPayloadType.micheline, payload);
}

private void OnPayloadSigned(SignResult obj)
{
    // Result is true if the message is signed correctly
    // And that it came from the currently-connected wallet
    var result = TezosManager.Instance.Wallet.VerifySignedPayload(SignPayloadType.micheline, payload);

    Debug.Log($"Payload verification response: {result}");
}
Changing the RPC node
As described in The RPC interface, Tezos clients including the Unity SDK send transactions to RPC nodes. By default, the SDK sends requests to a public RPC node that uses the Ghostnet test network, where you can test transactions without spending real tez. For more information about test networks, see Testing on sandboxes and testnets.
If you need to change the RPC node that the SDK uses, such as if the default node is overloaded or if you are ready to send transactions to Mainnet, you can set the RPC node by creating an instance of the TezosConfigSO scriptable object and setting the node in the Rpc Url Format field, as in this picture:

Then, drag this instance of the TezosConfigSO scriptable object to the Config field of the TezosManager prefab.
For more examples of how to work with the SDK, see Tutorial scenes.